Hello and welcome to part 2 of this short studio walkthrough series. In this installment, we’re covering studio hardware and sound treatment. No need for a long intro. Let’s jump right in!
Sound Treatment
This is one area that I haven’t spent a lot of time or money on, admittedly. My room is fairly small but didn’t sound awful, so my immediate goal was to kill a lot of the flutter/reflection echo, and I need all acoustic treatment to be removable since I live in a townhome apartment.


Signal Processing

The HD Pro gives me the flexibility to record in more ways than I’ll ever need. I can record a raw guitar signal for later processing (or reamping), process the sound through the HD Pro and record directly using its USB interface sources, or run a line-out to my external interface (which is what I do since you can’t use more than one set of ASIO drivers on a computer at once). Hell, it even has its own mic input, so I could essentially use this for everything. But doing that would seriously limit my recording options outside of guitar, so I usually opt to run a couple lines from the HD Pro to my other interface so I only have one sound source to worry about.
The HD Pro even has a couple bass amps built in that I really like, so it’s hard to justify the complexity of mic’ing up a bunch of amps and spending hours dialing in tones everytime I want to record.
And this brings me to a little side-note. Amp simulation technology has become jaw-droppingly accurate to the original amp tones. Line 6, Kemper, and Axe FX all have some seriously ground-breaking stuff going on. It’s 2015, guys. If you’re still mic’ing your amps in a tiny home studio, I think it’s only fair that you ask yourself this — Do you actually hear a POSITIVE difference, or are you just too stubborn (or uninformed) to give modern recording options a chance? End rant.
Recording
Now that we have our sounds processed, let’s follow the cables to the next component in the line — the audio interface. If you check out my Audio Production 101 article, you’ll see that the audio interface is the unit that processes audio signals sound and sends them to your computer for playback and recording
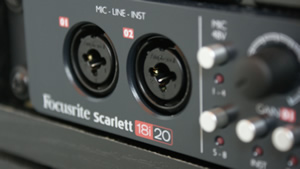
The only drawback I’ve found is that it’s a USB 2.0 device. I only say this is a drawback because it has a firewire sibling — the Saffire Pro 40. That said, firewire is finicky on Windows machines, so I opted for the USB Scarlett. This unit has been tested and proven to run at full input/output capacity with absolutely no issues and it’s been flawless for me.
I don’t run any hardware compressors, eq’s, or other signal processors because at this stage I simply don’t need them. I’m extremely happy with my software plugins.

After the interface comes the computer. In my case, my primary recording tower is pretty basic. Intel i5, 12GB RAM, and 1.5TB storage. I run dual 22″ monitors for maximum desktop real estate (I’m A.D.D. …do you expect me to only use one program at a time?).
Monitoring

Speaking of monitoring, let’s take a look at my listening devices.


I think that covers hardware and sound treatment. Let me know if you have any questions in the comments below and keep an eye out next week for part 3 where I’ll be discussing my software and also how I bring all of these components together.
Lastly, if you dig this article, the site, and/or my music, please consider sharing to help spread the word. This content is absolutely free of charge, but I need your help to get it out to the world!
Leave a Reply